A smart lock offers unparalleled convenience and security, but a common issue that can undermine both is a loose escutcheon plate. This exterior or interior trim piece, essential for both aesthetics and function, can become wobbly over time, leading to concerns about durability and even security. If you’ve noticed your smart lock’s escutcheon plate is no longer snug, don’t fret. This guide will walk you through the causes, necessary tools, and a step-by-step process to fix it, ensuring your smart home remains secure and your lock performs optimally.
Understanding Your Smart Lock’s Escutcheon Plate
The escutcheon plate is the decorative and functional cover that surrounds the keyhole, keypad, or fingerprint scanner on both the exterior and interior sides of your door. Its primary purpose is to protect the internal locking mechanism from dust and tampering, while also providing a finished look. Beyond aesthetics, the escutcheon plate often houses the mounting screws that secure the entire lock assembly to the door, making its stability crucial for the lock’s performance.
Why do these plates get loose? Several factors contribute to this common issue. Normal wear and tear, coupled with the daily vibration and repeated use of the door, can gradually cause the internal mounting screws to loosen. Over time, the slight movements can back out the screws, leading to a wobbly escutcheon. Furthermore, if the smart lock was not installed correctly from the beginning—perhaps the screws weren’t fully tightened or threadlocker wasn’t used—it can accelerate the loosening process. Changes in door material due to temperature or humidity can also subtly shift the lock’s alignment, impacting the tightness of the plate.
Essential Tools for the Job
Before you begin, gathering the right tools will make the repair process smooth and efficient. Most smart lock repairs are straightforward and require only basic household items.
Here’s what you’ll typically need:
- Screwdriver Set: You’ll likely need a Phillips head screwdriver. For some smart lock models, a flathead screwdriver or a set of Allen wrenches (hex keys) may be required, especially for set screws that secure handles or certain trim pieces. Check your smart lock’s manual for specific fastener types.
- Soft Cloth: Useful for cleaning any debris and protecting the lock’s finish during the repair.
- Blue Threadlocker (e.g., Loctite Blue): This is an optional but highly recommended item. A removable threadlocker can prevent screws from vibrating loose again without permanently bonding them. It’s crucial to use a removable (blue) threadlocker, not a permanent (red) one, as you may need to access these screws in the future.
- Small Prying Tool (Optional): A thin flathead screwdriver or a plastic spudger might be helpful for gently prying off snap-on covers without damaging the finish.
 Essential tools for smart lock repair including screwdriver, threadlocker, cloth.
Step-by-Step Guide to Tightening a Loose Smart Lock Escutcheon Plate
Addressing a loose escutcheon plate is a manageable DIY task. Follow these steps carefully to restore the stability and security of your smart lock.
Safety First: Prepare for the Repair
|
Our Picks for the Best Smart Lock in 2026
As an Amazon Associate I earn from qualifying purchases.
|
||
| Num | Product | Action |
|---|---|---|
| 1 | TEEHO TE001 Keyless Entry Door Lock with Keypad - Smart Deadbolt Lock for Front Door with 2 Keys - Auto Lock - Easy Installation - Matte Black |

|
| 2 | TEEHO TE001 Keyless Entry Door Lock with Keypad - Smart Deadbolt Lock for Front Door with 2 Keys - Auto Lock - Easy Installation - Satin Nickel |
|
| 3 | ULTRALOQ U-Bolt Pro WiFi Smart Lock with Door Sensor, 8-in-1 Keyless Entry Door Lock with Fingerprint ID, App Remote Control, Built-in WiFi Keypad Deadbolt, Auto Unlock, IP65 Waterproof, Easy Install |
|
| 4 | Electronic Passwords Keyless Entry Door Locks Smart Deadbolt Metal Lock Auto Time Delay Locking Secure Durable Low Battery Alert Type-C Port for Emergency Charging |
|
| 5 | Philips Wi-Fi Door Lock, WiFi Smart Lock Keyless Entry Deadbolt for Front Door, Remote Control, Built-in WiFi, APP Fingerprint Passcode Unlock, Auto Locking |
|
| 6 | TEEHO TE001 Keyless Entry Door Lock with Keypad - Smart Deadbolt Lock for Front Door with 2 Keys - Auto Lock - Easy Installation - Oil-Rubbed Bronze |
|
| 7 | eufy Security Smart Lock C220, Fingerprint Keyless Entry Door Lock, Built-in Wi-Fi, App Remote Control, Front Door Smart Lock Deadbolt, 8Months Battery, Reliable Power, IP53 Waterproof, BHMA Grade 3 |
|
| 8 | Schlage Encode Smart WiFi Deadbolt Lock for Front Door - Keyless Entry with App or Touchscreen - Works with Alexa, Hey Google, & Airbnb - Create Codes for Guests - Matte Black |
|
| 9 | Philips Wi-Fi Door Lock, WiFi Smart Lock Keyless Entry Deadbolt for Front Door, Compatible with Alexa & Google Assistant, Remote Control, Built-in WiFi, APP Fingerprint Passcode Unlock, Auto Locking |
|
| 10 | eufy Security Smart Lock C220, Fingerprint Keyless Entry Door Lock, Built-in Wi-Fi, App Remote Control, Front Door Smart Deadbolt, IP53 Waterproof, 8-Months Battery, Nickel |
|
Before you begin any work on your smart lock, prioritize safety. If your smart lock is battery-powered, it’s a good practice to temporarily remove the batteries. This prevents any unintended activations or electrical issues during the repair. Ensure your workspace is well-lit, and you have all your tools readily accessible. Working on a door that is held open and secure will also make the process easier.
Locate and Access the Mounting Screws
The first and often trickiest part is finding how to access the screws that hold the escutcheon plate in place. Smart locks vary greatly in their design:
- Visible Screws: Some simpler smart lock designs have screws clearly visible on the interior escutcheon plate.
- Hidden Under a Cover/Rose: Many modern smart locks conceal the mounting screws under a removable cover or a rotating trim piece (often called a “rose” or faceplate). You might need to gently pry off a plastic cap or rotate a metal trim ring to reveal the screws.
- Set Screws: For some handle-style smart locks, a small set screw on the underside of the lever or knob might need to be loosened to remove the handle and access the underlying escutcheon. These typically require an Allen wrench.
- Snap-on Plates: Certain models feature an escutcheon that simply snaps onto the lock assembly. These usually require careful prying with a thin tool to detach.
Consult your smart lock’s user manual if you’re unsure how to reveal the screws for your specific model.
Carefully Remove the Escutcheon Plate or Cover
Once you’ve located the access points, proceed with removing the outer components.
- For visible screws: Simply unscrew them. Keep them in a safe place.
- For hidden covers: Gently pry off plastic caps or rotate the trim ring counter-clockwise until it detaches.
- For set screws: Use the appropriate Allen wrench to loosen the set screw, then slide off the handle or knob. The escutcheon plate should then be removable, or its screws exposed.
- For snap-on plates: Using a plastic spudger or a thin flathead screwdriver, carefully wedge it into a seam and gently pry the plate away from the door. Be cautious not to scratch the door or the lock finish.
Inspect Internal Components and Screws
With the escutcheon plate removed, you’ll see the internal workings and the main mounting screws that pass through the door. Take a moment to inspect everything:
- Check for Damage: Look for any signs of wear, cracks, or broken components. If you notice significant damage, a simple tightening might not be enough, and replacement parts or professional assistance may be needed.
- Verify Alignment: Ensure the spindle (the square or rectangular shaft that connects the interior and exterior handles) is correctly seated and not bent.
- Identify Loose Screws: The primary goal is to identify the screws responsible for securing the main lock body and escutcheon to the door. These are typically longer machine screws that pass through the door and connect the two halves of the lock.
Tighten the Internal Mounting Screws
This is the core of the repair. Using the correct screwdriver, begin tightening the exposed mounting screws.
- Tighten Systematically: Start with one screw and tighten it until it’s snug. Then move to the next.
- Avoid Overtightening: It’s crucial not to overtighten the screws. Overtightening can strip the threads in the lock’s components, making the problem worse, or even crack the door material or internal plastic parts of the lock. Tighten them firmly until there’s no wobble, but stop before you feel excessive resistance.
- Apply Threadlocker (Optional but Recommended): If you have blue threadlocker, apply a small drop to the threads of each screw before fully tightening them. This will help prevent the screws from vibrating loose again over time. Remember, use only blue (removable) threadlocker.
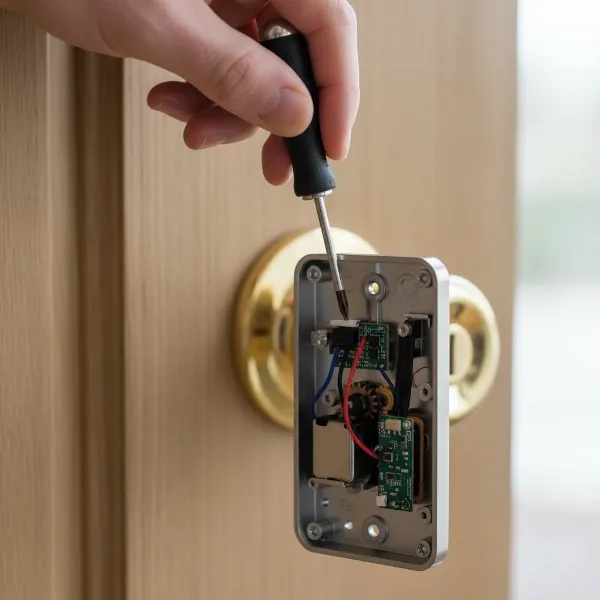 Hand using a screwdriver to tighten internal mounting screws of a smart lock.
Reassemble the Smart Lock
Once all screws are tightened, it’s time to put everything back together.
- Reattach the Escutcheon Plate/Cover: Carefully place the escutcheon plate back into position, ensuring proper alignment with the lock body and any holes in the door.
- Secure the Cover/Handle: Reattach any covers, snap-on plates, or handles. If there’s a set screw, tighten it firmly to secure the handle.
- Reinstall Batteries: If you removed the batteries earlier, put them back into the smart lock.
- Test Functionality: Operate the smart lock manually with the deadbolt or latch, use your code, fingerprint, or app to ensure it functions correctly and the escutcheon plate no longer wobbles. Check both the interior and exterior sides.
Preventing Future Loosening
A bit of proactive maintenance can save you from repeat repairs.
- Regular Checks: Periodically check your smart lock’s escutcheon plate for any signs of looseness. A quick wiggle every few months can help you catch the issue early.
- Proper Installation: If you’re installing a new smart lock, ensure all mounting screws are properly tightened, and consider using blue threadlocker during the initial installation.
- Avoid Excessive Force: Be mindful not to yank or put unnecessary strain on the door handle or lock, as this can contribute to screws loosening over time.
When to Call a Professional
While fixing a loose escutcheon plate is often straightforward, there are situations where professional help is advisable:
- Uncertainty: If you’re unsure about any step or uncomfortable working with the lock’s internal mechanisms.
- Complex Locks: Some high-end smart locks have intricate designs that might be better handled by a trained technician.
- Persistent Loosening: If the escutcheon plate repeatedly comes loose despite your attempts to tighten it, there might be an underlying issue such as stripped threads, damaged components, or a misaligned door frame.
- Internal Damage: If you discover any broken parts, significant wear, or electrical issues within the lock, a professional can diagnose and repair or replace the damaged components safely.
“While many smart lock issues are DIY-friendly, knowing when to call a professional can prevent further damage and ensure your home’s security is never compromised.” – Admin, smartlockchoice.com
Conclusion
A loose smart lock escutcheon plate is a common nuisance that can be easily resolved with the right tools and a systematic approach. By understanding why it happens, preparing properly, and following the steps to tighten the internal mounting screws, you can restore the stability and aesthetic appeal of your smart lock. Regular maintenance and careful handling will further ensure the longevity and reliable performance of your device. Don’t let a wobbly plate diminish your confidence in smart home security – empower yourself with the knowledge to keep your smart lock perfectly secure.
Is your smart lock feeling more stable and secure now, or are you ready to explore further smart home enhancements?
Frequently Asked Questions
Why does my smart lock feel wobbly, even after tightening?
If your smart lock still feels wobbly after tightening the escutcheon plate screws, it might indicate an issue with the internal components, such as a worn spindle or a slightly oversized bore hole in the door. It could also mean the main through-bolts are stripped or bent. In such cases, further inspection or professional assessment is recommended to identify the root cause.
Can I use any screwdriver to fix my smart lock?
No, it’s crucial to use the correct type and size of screwdriver that fits the screws on your smart lock. Using an ill-fitting screwdriver can strip the screw heads, making them impossible to tighten or remove, and potentially causing further damage to the lock or your door. Always check your lock’s manual for specific tool requirements.
What is Loctite, and should I use it on my smart lock?
Loctite is a brand of threadlocker, a chemical adhesive that prevents screws from loosening due to vibration or movement. For smart locks, using a blue (removable) threadlocker on the mounting screws is highly recommended. It adds an extra layer of security against loosening without making future disassembly impossible, enhancing the lock’s long-term stability.
How often should I check my smart lock’s escutcheon?
It’s a good practice to visually inspect and gently test the tightness of your smart lock’s escutcheon plate every 3 to 6 months. This routine check allows you to catch any signs of loosening early, preventing the issue from worsening and ensuring the continuous secure operation of your smart lock.
Is a loose escutcheon a security risk for my smart lock?
While a slightly loose escutcheon plate might seem minor, it can indicate that the underlying mounting screws are also loose. If these primary screws are not secure, the entire lock assembly can be compromised, potentially making it easier for intruders to tamper with or forcibly remove the lock. Therefore, fixing a loose escutcheon is important for maintaining your smart lock’s security.