Are you tired of fumbling for keys or constantly worrying about the security of your home? Upgrading to a smart lock can revolutionize your daily routine, offering unparalleled convenience and peace of mind. While the idea of installing smart home tech might seem daunting, many modern smart locks are designed for easy, DIY installation. This comprehensive guide will walk you through every step, demonstrating how you can install a smart lock yourself, often in less than 30 minutes, without needing a professional. Get ready to embrace a smarter, key-free lifestyle!
What is a Smart Lock and Why You Need One
A smart lock is an electromechanical lock that can be controlled and monitored remotely using a smartphone app or other smart home devices. Unlike traditional locks, smart locks utilize various technologies, including keypads, fingerprint sensors, Bluetooth, and Wi-Fi, to provide keyless entry and enhanced security. They offer a multitude of functions, from granting temporary access codes to guests and service providers to locking and unlocking your door from anywhere in the world.
The benefits of a smart lock extend far beyond simply going keyless. Imagine never having to hide a spare key again or being able to check if your door is locked while on vacation. Smart locks integrate seamlessly with other smart home systems, allowing for automated routines, such as turning on lights when you unlock your door. They are ideal for homes, offices, and even rental properties, offering flexible access control and real-time monitoring. While the installation might appear complex at first glance, the process is surprisingly straightforward for most DIY enthusiasts.
Before You Begin: Pre-Installation Checklist
Successful smart lock installation starts with proper preparation. Taking a few minutes to gather your tools and check your door’s compatibility will save you time and frustration down the line.
Essential Tools
You won’t need a toolbox full of specialized equipment to install most smart locks. The basic tools you’ll require include:
- Phillips Head Screwdriver: This is the primary tool for removing your old lock and securing the new one. An electric drill with a Phillips bit can speed up the process, but a manual screwdriver works perfectly.
- Tape Measure: Essential for checking door dimensions.
- Pencil: For marking adjustments if needed.
- Chisel (Optional): You might need a chisel to make minor adjustments to the strike plate opening if the deadbolt doesn’t operate smoothly.
|
Our Picks for the Best Smart Lock in 2026
As an Amazon Associate I earn from qualifying purchases.
|
||
| Num | Product | Action |
|---|---|---|
| 1 | Electronic Passwords Keyless Entry Door Locks Smart Deadbolt Metal Lock Auto Time Delay Locking Secure Durable Low Battery Alert Type-C Port for Emergency Charging |

|
| 2 | Philips Wi-Fi Door Lock, WiFi Smart Lock Keyless Entry Deadbolt for Front Door, Remote Control, Built-in WiFi, APP Fingerprint Passcode Unlock, Auto Locking |
|
| 3 | TEEHO TE001 Keyless Entry Door Lock with Keypad - Smart Deadbolt Lock for Front Door with 2 Keys - Auto Lock - Easy Installation - Oil-Rubbed Bronze |
|
| 4 | ULTRALOQ U-Bolt Pro WiFi Smart Lock with Door Sensor, 8-in-1 Keyless Entry Door Lock with Fingerprint ID, App Remote Control, Built-in WiFi Keypad Deadbolt, Auto Unlock, IP65 Waterproof, Easy Install |
|
| 5 | TEEHO TE001 Keyless Entry Door Lock with Keypad - Smart Deadbolt Lock for Front Door with 2 Keys - Auto Lock - Easy Installation - Satin Nickel |
|
| 6 | eufy Security Smart Lock C220, Fingerprint Keyless Entry Door Lock, Built-in Wi-Fi, App Remote Control, Front Door Smart Deadbolt, IP53 Waterproof, 8-Months Battery, Nickel |
|
| 7 | TEEHO TE001 Keyless Entry Door Lock with Keypad - Smart Deadbolt Lock for Front Door with 2 Keys - Auto Lock - Easy Installation - Matte Black |
|
| 8 | eufy Security Smart Lock C220, Fingerprint Keyless Entry Door Lock, Built-in Wi-Fi, App Remote Control, Front Door Smart Lock Deadbolt, 8Months Battery, Reliable Power, IP53 Waterproof, BHMA Grade 3 |
|
| 9 | Schlage Encode Smart WiFi Deadbolt Lock for Front Door - Keyless Entry with App or Touchscreen - Works with Alexa, Hey Google, & Airbnb - Create Codes for Guests - Matte Black |
|
| 10 | Philips Wi-Fi Door Lock, WiFi Smart Lock Keyless Entry Deadbolt for Front Door, Compatible with Alexa & Google Assistant, Remote Control, Built-in WiFi, APP Fingerprint Passcode Unlock, Auto Locking |
|
Door Compatibility
Before purchasing your smart lock, ensure it’s compatible with your door. Most smart locks are designed to fit standard door dimensions. Here’s what to measure:
- Door Thickness: Most smart locks fit doors between 1 3/8 inches and 2 inches thick.
- Backset Measurement: This is the distance from the edge of your door to the center of the bore hole (the large round hole where the lock sits). Standard backsets are typically 2 3/8 inches or 2 3/4 inches.
- Bore Hole Diameter: The round opening in your door where the lock body is installed should generally be 2 1/8 inches.
Confirming these measurements will ensure your new smart lock fits perfectly without modifications.
Unbox and Verify Contents
Once you have your smart lock, carefully unbox it and lay out all the components. Your kit should include:
- The exterior keypad or touchscreen assembly.
- The interior assembly (often containing the battery compartment and thumb-turn).
- The deadbolt or latch mechanism.
- A strike plate for the door frame.
- All necessary screws and mounting hardware.
- The instruction manual.
Double-check that all parts are present against the manual’s inventory list. If anything is missing, contact the manufacturer before proceeding.
Download the App
Most smart locks require a companion mobile app for initial setup, calibration, and ongoing management. Download the manufacturer’s app from your smartphone’s app store (Apple App Store or Google Play Store) before you start the physical installation. This will allow you to access installation videos and complete the final setup steps seamlessly.
Step-by-Step: Installing Your Smart Lock in Under 30 Minutes
With your tools ready and door measurements confirmed, it’s time to install your smart lock. Follow these steps for a quick and successful upgrade.
Remove Your Old Lock
Begin by removing your existing deadbolt. Use a Phillips head screwdriver to loosen and remove the two screws securing the interior thumb-turn assembly. Once these screws are out, both the interior and exterior parts of the lock should slide free. Next, remove the latch from the edge of the door by unscrewing its small faceplate screws. Finally, remove the strike plate from the door frame. Keep your old hardware in case you need it in the future.
Install the New Latch/Deadbolt
Take the new deadbolt or latch provided with your smart lock and slide it into the opening on the edge of the door. Ensure the slanted side of the bolt faces the direction your door closes. Most deadbolts are adjustable, so if your backset measurement is different, adjust the latch to match either 2 3/8 inches or 2 3/4 inches, depending on your door. Once it sits flush with the door’s edge, secure it with the provided screws. A properly aligned latch is crucial for smooth operation.
Mount the Exterior Keypad/Assembly
Feed the data cable (if your lock has one) from the exterior keypad through the bore hole in the door so it reaches the inside. Position the exterior keypad or touchscreen assembly on the outside surface of the door, making sure it is level and straight. From the inside, insert the long mounting screws through the mounting plate and into the exterior assembly, tightening them carefully. The keypad should feel secure but avoid over-tightening, as this can put undue pressure on the internal electronics.
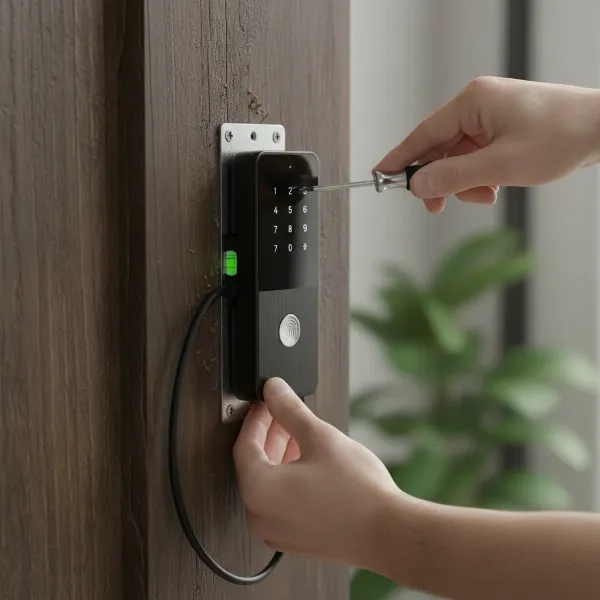 person installing smart lock exterior keypad on wooden door with screws
Connect the Interior Assembly
Bring the interior assembly of the smart lock to the inside of the door. Connect the data cable from the exterior keypad to the corresponding port on the interior unit’s circuit board. Next, align the tailpiece (the small metal shaft extending from the deadbolt) so it slides directly into the deadbolt mechanism on the interior assembly. Once everything lines up, attach the interior assembly to the door, securing it with the remaining screws provided in your kit. Tighten them until the assembly feels solid and steady. Tuck any excess wiring neatly into the housing.
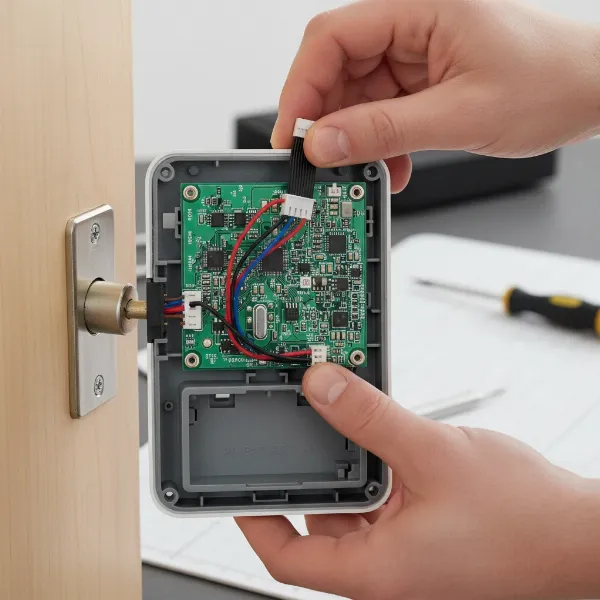 connecting smart lock interior unit cables to circuit board securely
Insert Batteries and Attach Cover
Most smart locks are battery-powered. Locate the battery compartment, typically on the interior assembly, and insert the recommended batteries (usually AA or AAA). Many locks come with a plastic tab that needs to be removed to activate the batteries. Once the batteries are in place, attach the battery cover or faceplate, ensuring it snaps securely.
Calibrate and Set Up via App
This is where your pre-downloaded app comes in handy. Open the app and follow the on-screen instructions to connect your smart lock. This usually involves connecting via Bluetooth or Wi-Fi. The app will then guide you through a calibration process, which teaches the lock the full range of motion of your deadbolt. You’ll also set up master codes, user codes, fingerprints (if applicable), and integrate the lock with your smart home system for features like geofencing or voice control.
Test Functionality
Before you consider the job done, thoroughly test your new smart lock.
- Manually: Turn the thumb-turn on the interior assembly to lock and unlock the door several times.
- Via App: Use your smartphone app to lock and unlock the door, ensuring it responds promptly.
- Keypad/Fingerprint: Test any key codes or fingerprint access you’ve set up.
Ensure the deadbolt extends and retracts smoothly without sticking or requiring excessive force. The door should lock and unlock completely.
Troubleshooting Common Smart Lock Installation Issues
Even with careful planning, sometimes things don’t go perfectly. Here are some common problems and how to quickly resolve them.
Deadbolt Sticking or Not Engaging
This is often an alignment issue. If the deadbolt feels stiff, doesn’t extend fully, or gets stuck, check the following:
- Strike Plate Alignment: The hole in your door frame where the deadbolt enters might not align perfectly with the deadbolt. Loosen the strike plate screws, adjust its position slightly, and retighten. You might need to use a chisel to slightly enlarge the opening if the bolt catches on the frame.
- Door Sagging: Sometimes, the door itself might be slightly misaligned on its hinges. Ensure the door closes fully and evenly before the deadbolt attempts to engage.
- Internal Components: Recheck that the tailpiece is correctly inserted into the deadbolt mechanism and that the interior and exterior assemblies are flush and not putting pressure on any moving parts.
Keypad Not Responding/Lock Not Powering On
If the keypad doesn’t light up or the lock seems unresponsive:
- Batteries: The most common culprit is low or dead batteries, or they might be inserted incorrectly. Replace them with fresh, high-quality alkaline or lithium batteries, ensuring correct polarity.
- Wiring: Double-check that all cables are securely connected and not pinched during assembly.
- Factory Reset: If batteries and wiring are fine, a factory reset (refer to your manual for specific instructions) followed by re-pairing can often resolve electronic glitches.
Connectivity Problems (Won’t Pair to App/Wi-Fi)
Issues connecting to your smartphone or home network are usually related to signals or software:
- Bluetooth/Wi-Fi: Ensure your phone’s Bluetooth is on, or your Wi-Fi network is active and strong. Try moving closer to your router if using Wi-Fi.
- App Updates: Make sure your smart lock app is updated to the latest version.
- Restart Devices: Try restarting your smartphone and, if possible, your smart lock (by temporarily removing and reinserting batteries).
- Factory Reset: As a last resort, performing a factory reset on the lock and re-initiating the pairing process can help.
Door Requires Force to Close
If you find yourself having to push or pull the door hard for the deadbolt to engage, the strike plate’s position might be too far back or forward. You may need to adjust the strike plate by loosening screws and shifting it slightly, or carefully enlarging the hole in the door frame with a file or chisel. Always proceed cautiously to avoid making the hole too large.
“A common misconception is that smart lock installation is complex. In reality, most designs are incredibly user-friendly, allowing homeowners to enhance their security in mere minutes with basic tools.” – Sarah Chen, Smart Home Technology Expert
Conclusion
Installing a smart lock yourself is a rewarding and surprisingly straightforward DIY project that significantly upgrades your home’s security and convenience. By following these clear, step-by-step instructions and performing essential pre-installation checks, you can effortlessly replace your old deadbolt with a cutting-edge smart lock, often in under 30 minutes. The immediate benefits of keyless entry, remote access, and integrated smart home functionality will quickly make you wonder why you didn’t make the switch sooner.
Ready to take control of your home’s entry points and simplify your life? What smart lock features are you most excited to experience in your newly secured home?